Skin Cancer Dysplastic Nevus – What You Need to Know
Skin cancer dysplastic nevus is a term that often raises questions and concerns. If you’ve ever been told you have…
Healthy habits, happy life.
Skin cancer dysplastic nevus is a term that often raises questions and concerns. If you’ve ever been told you have…
Who Is Rachael Ray? A Quick Overview Before diving into the details of Rachael Ray’s health, it’s important to understand…
The Purina Pro Plan Sensitive Skin and Stomach formula is specially crafted to support dogs with both digestive sensitivities and…
Skin walkers are among the most chilling and mysterious figures in Native American folklore. Rooted in Navajo tradition and feared…
Lid surgery, also known as blepharoplasty, is one of the most commonly requested cosmetic procedures worldwide. Whether it’s to improve…
Saunas have been used for thousands of years for their health benefits—from improving circulation to reducing stress and helping muscles…
Dental bonding is one of the most affordable and non-invasive cosmetic dental treatments available today. If you’ve been considering improving…
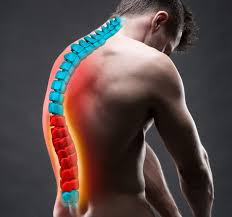
What You’ll Learn This guide will help you clearly understand the key distinctions between kyphosis and lordosis, and give you…
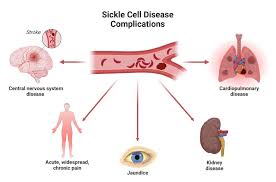
Sickle cell anemia is one of the most common inherited blood disorders in the world, yet it remains widely misunderstood.…
Corrective chin surgery is a specialized procedure designed to improve the appearance and function of the chin by addressing structural…